Label Gap sensor settings made simple.
Often Time customers change their label materials from one supplier or job to another. This can sometimes mean that an adjustment to the gap sensor calibration is needed. We sometimes receive technical support calls for these types of questions, so we decided why not give a few quick tips on this subject.
First things first, when selecting a new label or supplier there are a few options for the label and backing material. If the label is opaque (paper, film, or another type of laminated plastic) then a standard label gap sensor (optical) is the right call. If Clear labels are to be used, then an ultrasonic label gap sensor is the best call. The critical thing to remember is that the Label Material, not the backing, is what determines what type of gap sensor is required. Many sensors have an auto teaching function but for the purposes of this article we will focus on two primary methods on the labeling machine gap sensors that we commonly use.

Schneider gap sensor
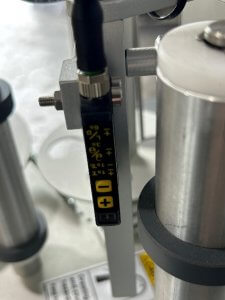
This is our most common gap sensor, made by Schneider Electric. The steps to adjusting this Gap sensor are fairly easy and a step by step approach to each function is below:
- Place the label backing material only in the label gap sensor. Next press and hold the – + keys together for 1 second. This places the sensor in calibration mode and the indicator light will begin blinking.
- Next move the label backing material WITH a label into the gap sensor and then press the – key. These two point teach methods work 99% of the time.
- To fine tune the sensitivity of the sensor you can simply use the – + keys to fine tune the sensitivity up or down.
- Adjust up using + key is a gap is being missed, use the – key if the sensor is reporting multiple gaps or if there is a light area of print that is giving false gaps signals.
The output mode (gap or label) is reversible by holding down the – + keys together for 6 seconds, holding them down for only 3 seconds will lock the buttons. This will be evident by a constant red light being illuminated.

Tri-Tronics LER label gap sesnor
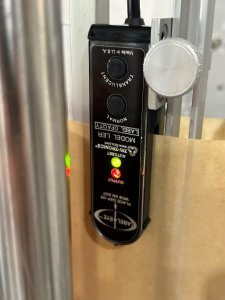
Another sensor that is commonly used is the LER Gap Sensor by Tritronics. (Pictured)
The method for this sensor is quite simple. Place the label backing material without a label into the gap sensor and press the normal button on the sensor for approximately 3 seconds. The red light indicates a gap is detected. The green light is a power indication only.
To reverse the output method of this sensor (gap vs label) simply hold both buttons down at the same time for 3 seconds.
Please do not hesitate to call us with questions about any of the equipment we offer. We are also glad to supply machinery for all your packaging needs. We design fully customizable labeling machines, filling machines, and capping machines. We design, manufacture and build it all in our factory located in Charleston South Carolina.
Thanks for reading and hope this helps.
The In-Line Packaging Systems Inc. Technical support team.
Reach us at www.inlinepack.com
Or our YouTube channel:
https://www.youtube.com/@InLinePackagingSystems
For info on the LER sensor.
visit www.ttco.com
For info on the Schneider Gap sensor


